Introduction: Security in a Multi-Cloud Environment
As multi-cloud architectures using both AWS and GCP become more common, the need to access AWS data or services from a GCP environment, especially Google Kubernetes Engine (GKE), is increasing. In the past, it was common to issue an AWS IAM user’s Access Key and configure it in the GKE application. However, Access Keys are long-term credentials that do not expire once issued, which poses a significant security risk if leaked.
To mitigate these security risks and simplify management, it is strongly recommended to switch to a method that uses temporary credentials by establishing a Trust Relationship with an AWS IAM Role. This approach significantly enhances security by eliminating the need to store Access Keys directly in code or configuration files.
This article provides a step-by-step guide on how to set up a trust relationship with an AWS IAM Role in a GKE environment to securely access AWS resources without Access Keys. It particularly focuses on reducing the management burden by leveraging GCP’s Workload Identity feature. This post is based on hands-on experience from building and testing this setup, as there was a lack of related resources.
Why Use IAM Role Trust Relationships Instead of Access Keys?
An AWS IAM Role is a collection of permissions for specific AWS resources. The biggest difference from an IAM user is that it does not have long-term credentials like an Access Key. Instead, a trusted entity can request temporary credentials to assume the role’s permissions for a predetermined period.
Using AWS IAM Roles in a GKE environment offers the following clear advantages:
- Enhanced Security: You don’t need to store sensitive long-term credentials like Access Keys in code, configuration files, or environment variables. Temporary credentials have a short validity period (default 1 hour, max 12 hours), significantly reducing the risk if they are compromised.
- Improved Manageability: You can assign roles with the minimum necessary permissions to each application or service (Pod), making permission management clearer and more granular (Principle of Least Privilege). There is also no need to periodically rotate Access Keys.
- Automation: The process of issuing and renewing credentials can be automated by integrating with Workload Identity, reducing operational overhead.
What is GKE Workload Identity?
Similar to AWS IAM Role-based trust relationships, GCP has a feature called Workload Identity. Workload Identity allows GCP resources like GKE to securely assume the permissions of a GCP service account without needing separate key files (like JSON).
In this article, we will use the method of granting a GKE Kubernetes Service Account (KSA) the permissions of a GCP Service Account (GSA). In other words, the Kubernetes Service Account (KSA) will access GCP resources through the GCP Service Account (GSA) role, and furthermore, access AWS resources through an AWS IAM Role.
For more details, it’s a good idea to refer to the official GCP documentation.
Reference: https://cloud.google.com/kubernetes-engine/docs/how-to/workload-identity
Configuration Steps: GCP (Google Cloud Platform)
Now, let’s start with the configuration.
First, let’s go through the specific steps to set up GKE Workload Identity and connect it with an AWS IAM Role.
1. Enable Workload Identity on the GKE Cluster
First, you need to enable Workload Identity on your GKE cluster using the gcloud CLI. Run the following command in your terminal.
(You need to modify the variable values with your own environment information.)
# Set environment variables (modify to match your environment)
export YOUR_GKE_CLUSTER_NAME="seoul-cluster"
export YOUR_GKE_ZONE="asia-northeast3-a"
export YOUR_GCP_PROJECT_ID="sharp-voyage-345407"

# Update GKE cluster (Enable Workload Identity)
gcloud container clusters update $YOUR_GKE_CLUSTER_NAME \
    --zone=$YOUR_GKE_ZONE \
    --workload-pool=${YOUR_GCP_PROJECT_ID}.svc.id.goog
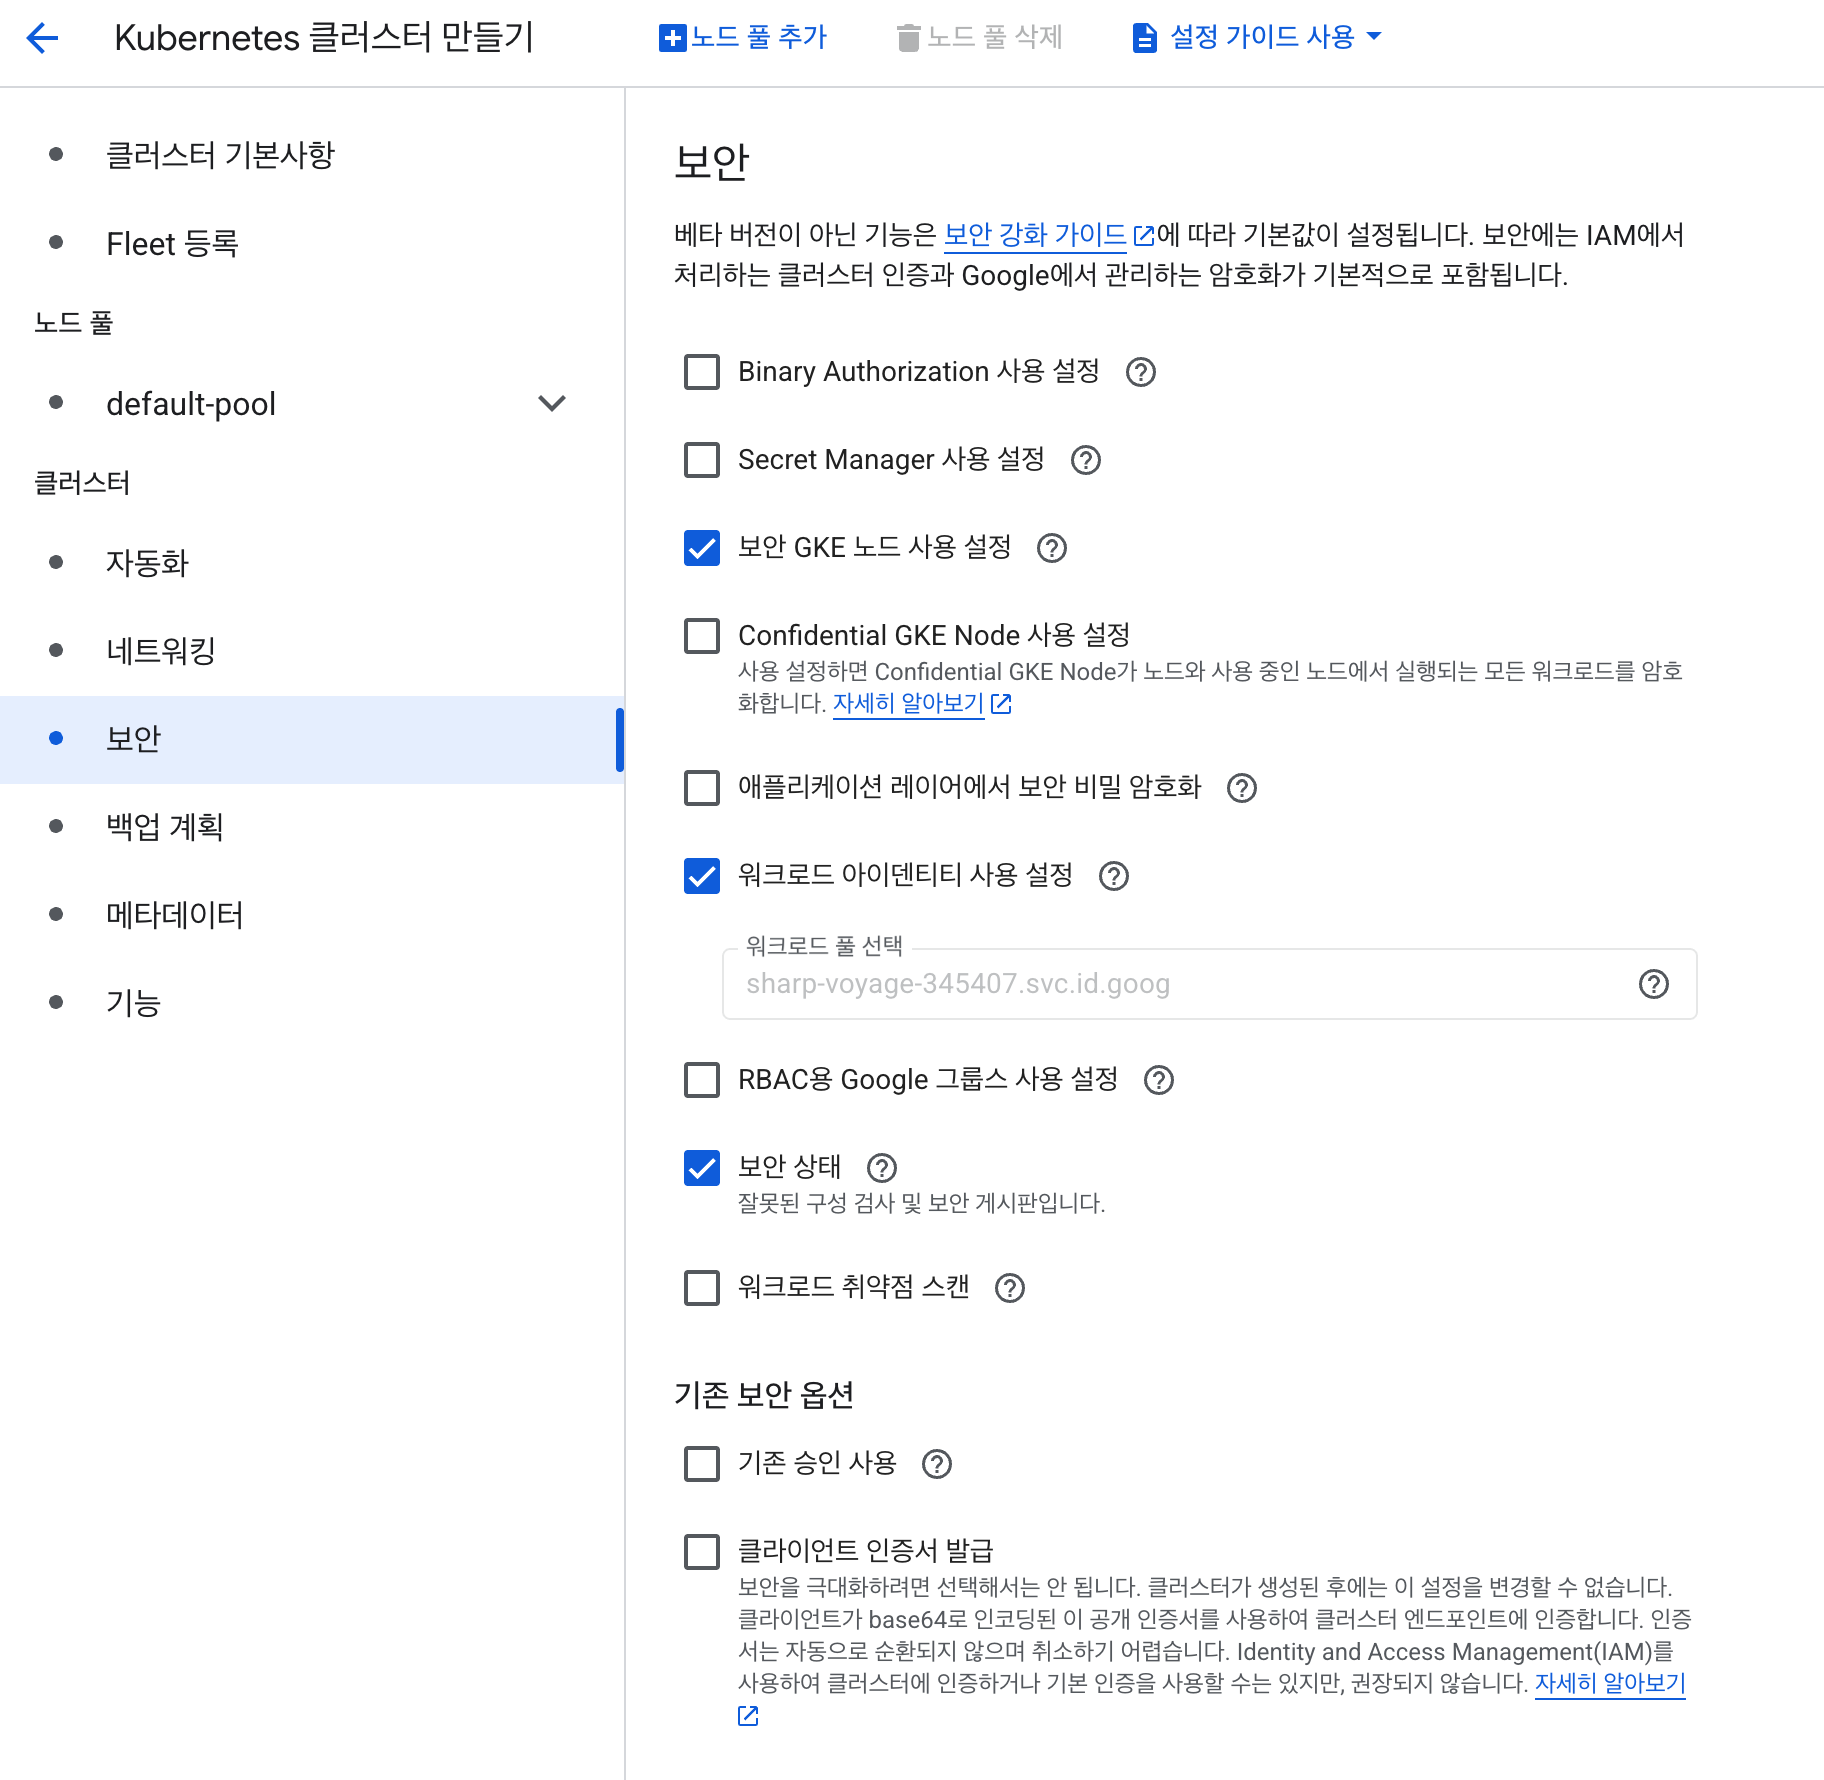
If you are creating a new GKE cluster, you can skip this step by checking the ‘Enable Workload Identity’ option in the ‘Security’ section of the creation process.
2. Create and Grant Permissions to a GCP Service Account (IAM Service Account)
Create a GCP service account that Workload Identity will use. We’ve added the Viewer permission to check if Workload Identity is correctly applied to GKE later.
# Set environment variables (can be changed to your desired name)
export YOUR_SERVICE_ACCOUNT_NAME="gcp-test-service-account"
export YOUR_GCP_PROJECT_ID="sharp-voyage-345407"

# Create GCP service account
gcloud iam service-accounts create $YOUR_SERVICE_ACCOUNT_NAME

# (Optional) Grant permissions for testing (e.g., Viewer role)
# In a real environment, you should grant only the minimum necessary permissions.
gcloud projects add-iam-policy-binding $YOUR_GCP_PROJECT_ID \
  --member="serviceAccount:$YOUR_SERVICE_ACCOUNT_NAME@${YOUR_GCP_PROJECT_ID}.iam.gserviceaccount.com" \
  --role="roles/viewer"
3. Create a Kubernetes Service Account (KSA)
Create a Kubernetes Service Account within the GKE cluster.
export YOUR_NAMESPACE=test-ns
export YOUR_KSA_NAME=test-sa

kubectl create namespace $YOUR_NAMESPACE

kubectl create serviceaccount $YOUR_KSA_NAME \
    --namespace=$YOUR_NAMESPACE
4. Connect GCP IAM to Kubernetes Service Account (IAM Policy Binding)
This is the core step of Workload Identity.
Add an IAM policy binding so that the created GSA can accept a specific KSA as a ‘user’.
This binding allows the KSA to assume the permissions of the GSA. The roles/iam.workloadIdentityUser role grants this permission.
export YOUR_GCP_PROJECT_ID="sharp-voyage-345407"
export YOUR_NAMESPACE=test-ns
export YOUR_KSA_NAME=test-sa

gcloud iam service-accounts add-iam-policy-binding $YOUR_SERVICE_ACCOUNT_NAME@${YOUR_GCP_PROJECT_ID}.iam.gserviceaccount.com \
    --role roles/iam.workloadIdentityUser \
    --member "serviceAccount:$YOUR_GCP_PROJECT_ID.svc.id.goog[$YOUR_NAMESPACE/$YOUR_KSA_NAME]"
5. Add KSA Annotation
An annotation needs to be added to the Kubernetes Service Account to let it know that it should get its permissions through GCP Workload Identity.
export YOUR_NAMESPACE=test-ns
export YOUR_KSA_NAME=test-sa
export YOUR_GCP_PROJECT_ID="sharp-voyage-345407"
export YOUR_SERVICE_ACCOUNT_NAME="gcp-test-service-account"

kubectl annotate serviceaccount $YOUR_KSA_NAME \
    --namespace $YOUR_NAMESPACE \
    iam.gke.io/gcp-service-account=$YOUR_SERVICE_ACCOUNT_NAME@$YOUR_GCP_PROJECT_ID.iam.gserviceaccount.com
Now the Workload Identity setup in GCP is complete. To test it, run the pod below and check if it executes normally.
apiVersion: v1
kind: Pod
metadata:
  name: gsutil-pod
spec:
  serviceAccountName: <KSA Service Account: test-sa>
  containers:
    - name: gsutil
      image: gcr.io/google.com/cloudsdktool/google-cloud-cli:stable
      command: ["/bin/sh", "-c"]
      args: ["gsutil ls"]
If you check the logs of this pod and see the list of GCS buckets, it’s a success.
Configuration Steps: AWS (Amazon Web Services)
The configuration in GCP is complete. Now, we need to configure AWS.
Unlike GCP, there isn’t much to configure in AWS. You just need to create the IAM Role you want to connect to.
This is because AWS has already set up OIDC with GCP, so no separate connection setup is needed.
For more information, you can refer to the AWS Docs below.
1. Get the Unique ID of the GCP Service Account (GSA)
Before setting up the AWS IAM Role, you need the unique ID of the GCP IAM to establish the trust relationship.
As shown below, use gcloud to look up the service account and find the uniqueId value.
export YOUR_SERVICE_ACCOUNT_NAME="gcp-test-service-account"
export YOUR_GCP_PROJECT_ID="sharp-voyage-345407"

gcloud iam service-accounts describe $YOUR_SERVICE_ACCOUNT_NAME@${YOUR_GCP_PROJECT_ID}.iam.gserviceaccount.com
In my case, I got the value uniqueId: ‘111035977024964273138’.
2. Create an AWS IAM Role
Create an IAM Role using the AWS Management Console or AWS CLI. In this article, we’ll use the AWS console.
As shown in the picture below, create an IAM Role. The selected options are as follows:
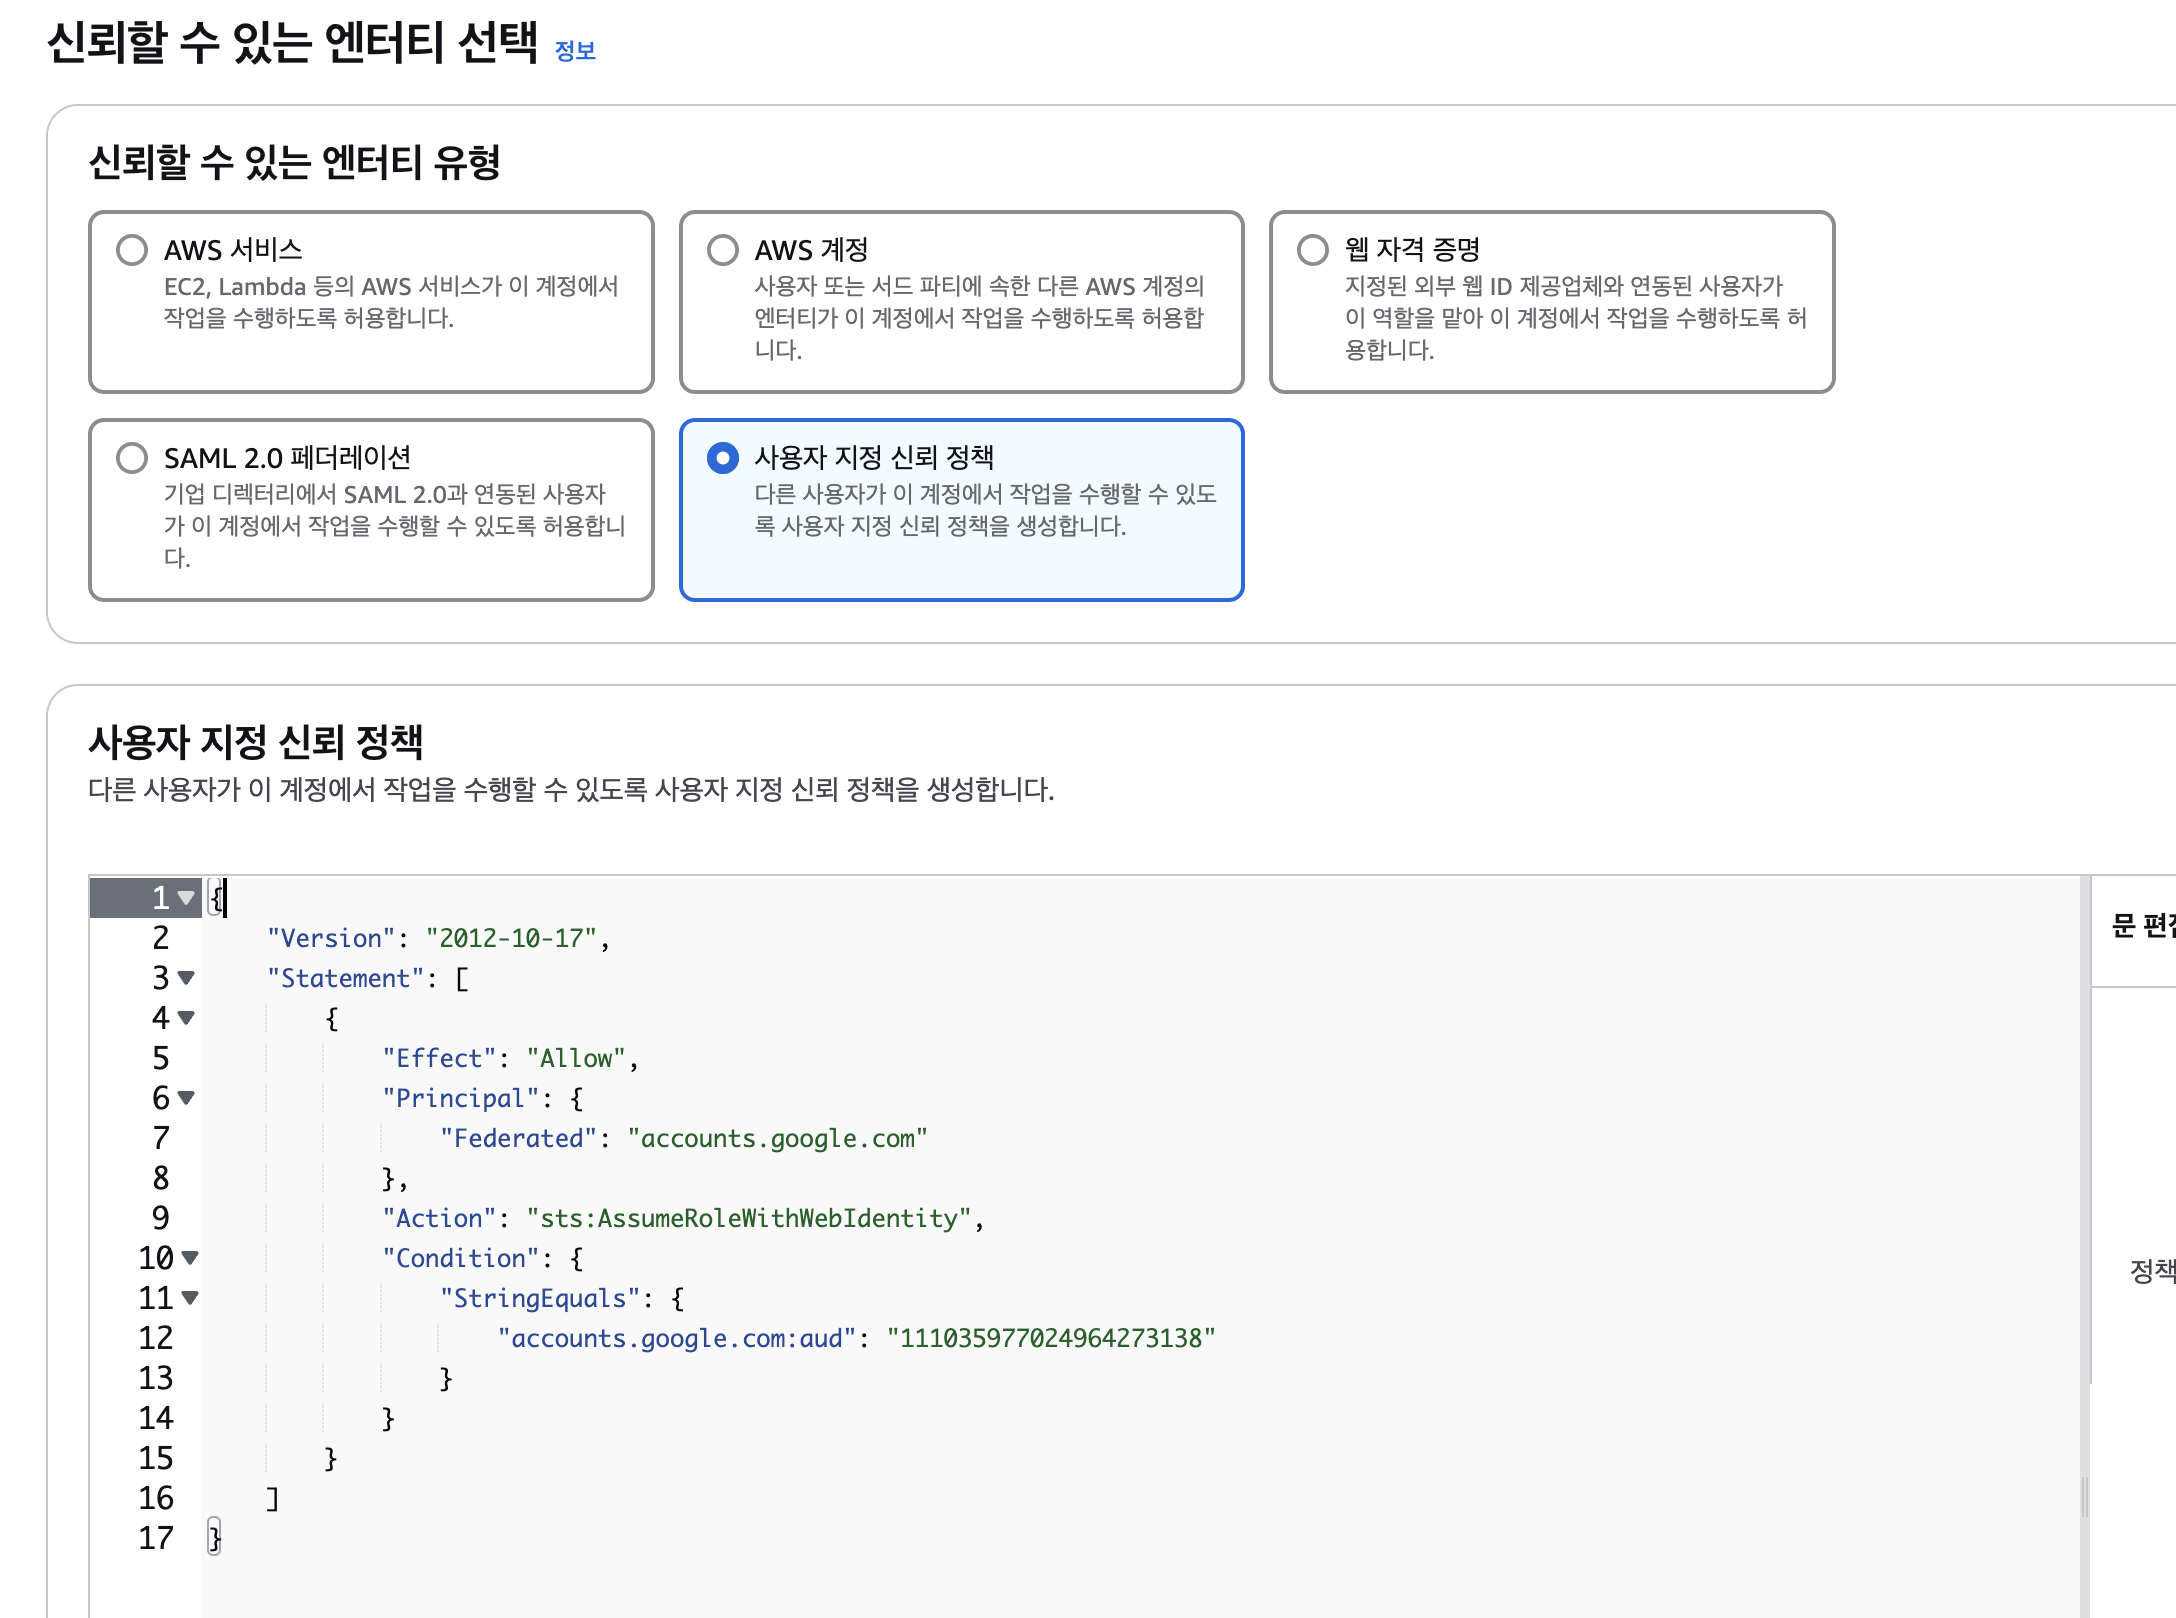
The custom trust policy you enter is as follows. (Enter UNIQUE_ID as a string).
{
    "Version": "2012-10-17",
    "Statement": [
        {
            "Effect": "Allow",
            "Principal": {
                "Federated": "accounts.google.com"
            },
            "Action": "sts:AssumeRoleWithWebIdentity",
            "Condition": {
                "StringEquals": {
                    "accounts.google.com:aud": "<YOUR_GSA_UNIQUE_ID>"
                }
            }
        }
    ]
}
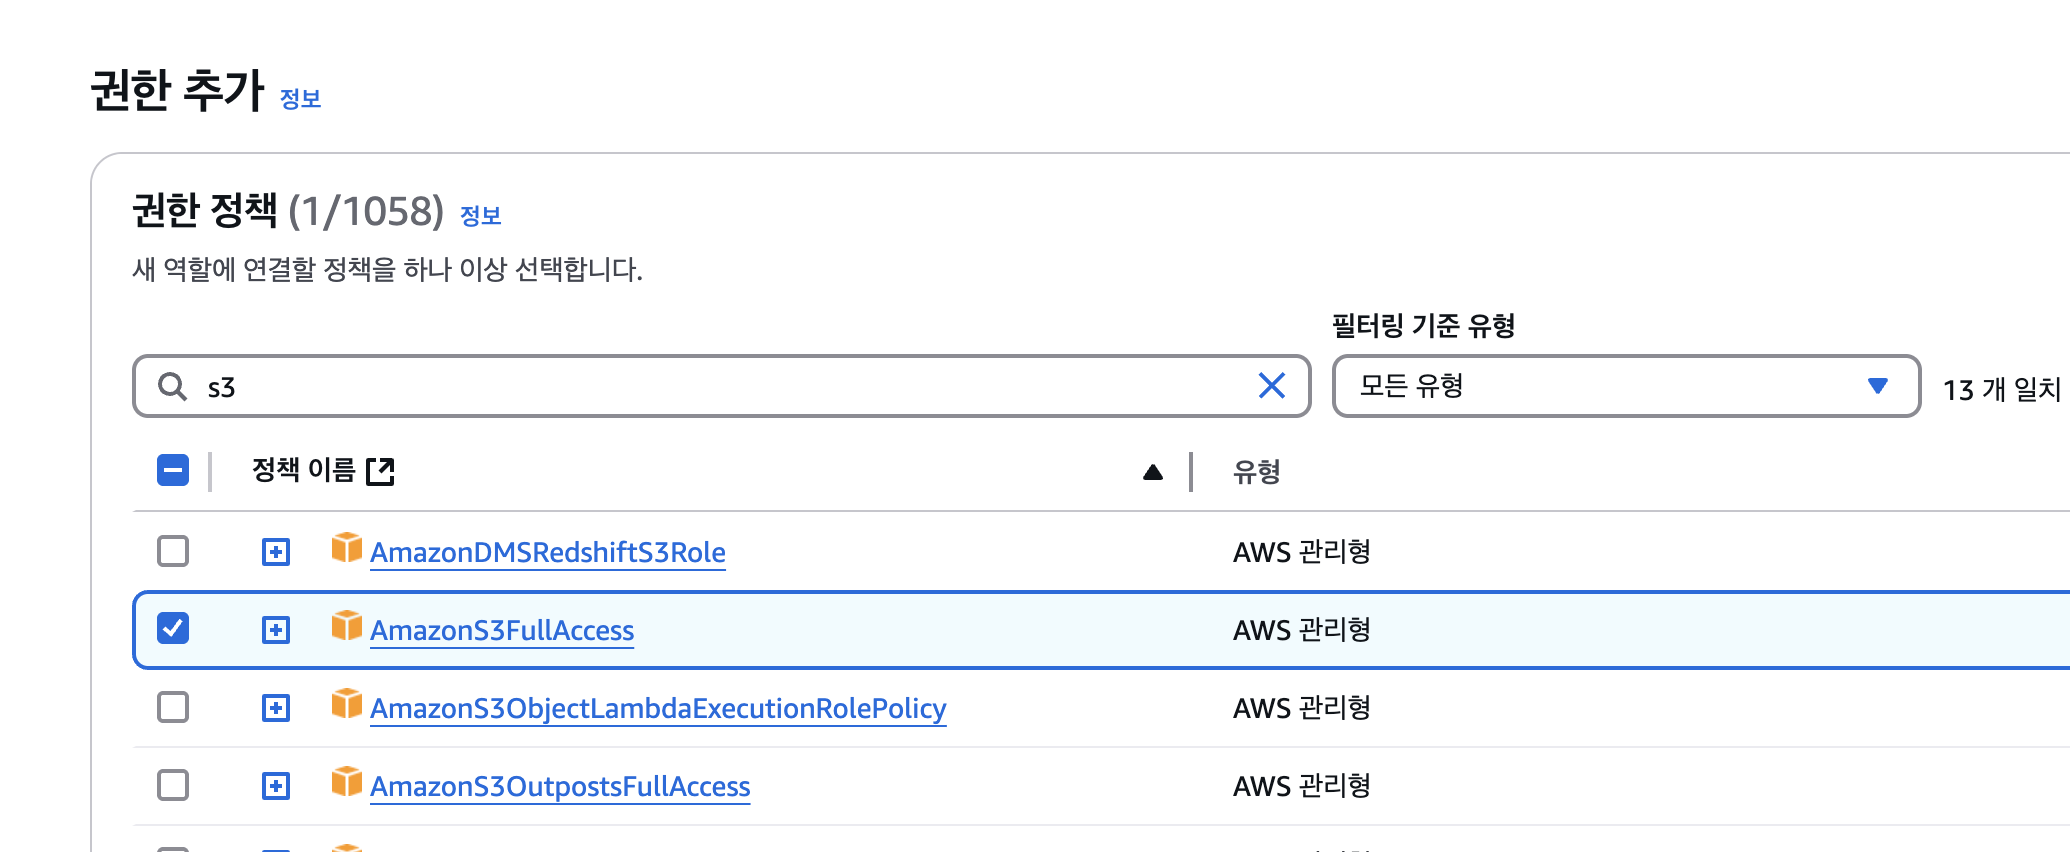
Afterward, to check if it works correctly, I granted S3 FullAccess permission.
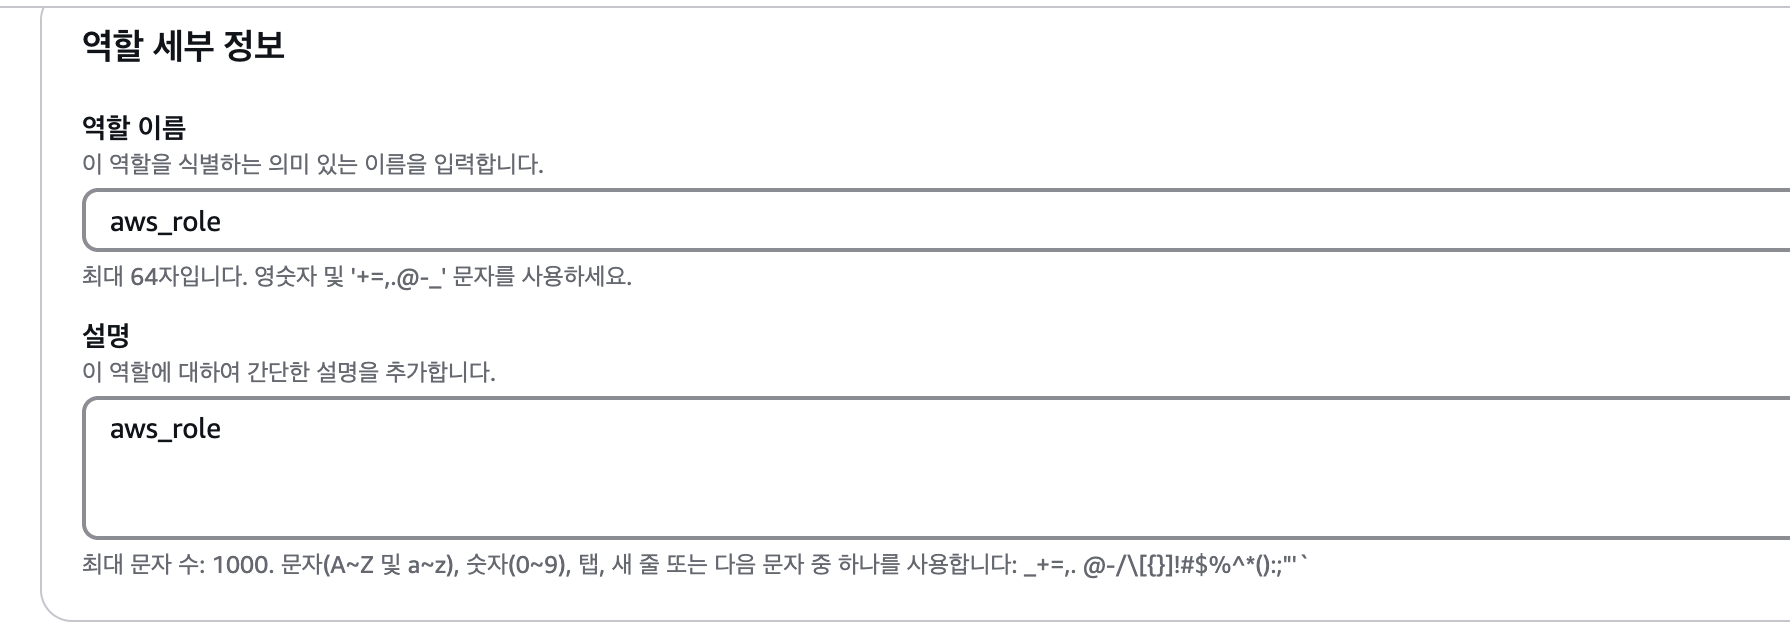
In the next step, I created an AWS IAM Role named aws_role.
3. Add AWS IAM Annotation to GKE Service Account
Now, add an annotation to the GKE Service Account so it can recognize the IAM Role created in AWS.
export YOUR_NAMESPACE=test-ns
export YOUR_KSA_NAME=test-sa
export YOUR_AWS_ROLE_ARN=arn:aws:iam::996145069080:role/aws_role

kubectl annotate serviceaccount $YOUR_KSA_NAME \
    --namespace $YOUR_NAMESPACE \
    amazonaws.com/role-arn=${YOUR_AWS_ROLE_ARN}
Convert AWS STS Token to GCP OIDC Token
This was the part I struggled with the most. I thought the process would be simple, but one additional step is required. You need to convert the AWS STS token into a format that can be used as a GCP OIDC token.
I used an excellent open-source project for this process.
https://github.com/doitintl/janus
You can use the janus.py script from this GitHub repository to set up the aws_credential.
In addition, the blog of the owner of the referenced repo, doitintl, mentions gtoken-webhook, an open-source tool that turns the AWS credential conversion process into a webhook. This is worth checking out.
The code used for testing is as follows.
apiVersion: v1
kind: ConfigMap
metadata:
  name: gcp-aws-credentials-script
data:
  get_aws_cred: |
    #!/usr/bin/python3
    import requests
    import boto3
    import json
    import sys
    import os


    def get_metadata(path: str, parameter: str):
        # Use .format() instead of f-type to support python version before 3.7
        metadata_url = 'http://metadata.google.internal/computeMetadata/v1/{}/{}'.format(path, parameter)
        headers = {'Metadata-Flavor': 'Google'}
        # execute http metadata request
        try:
            meta_request = requests.get(metadata_url, headers=headers)
        except requests.exceptions.RequestException as e:
            raise SystemExit(e)

        if meta_request.ok:
            return meta_request.text
        else:
            raise SystemExit('Compute Engine meta data error')


    if __name__ == '__main__':
        # Get AWS ARN from command line if specified
        if len(sys.argv) == 2:
            aws_role_arn = sys.argv[1]

        # Get AWS ARN from env var if specified
        elif 'AWS_JANUS_ROLE' in os.environ:
            aws_role_arn = os.environ['AWS_JANUS_ROLE']

        # Fail if both argv and env var configuration failed
        else:
            print('Please specify AWS arn role:\neither via env var `AWS_JANUS_ROLE` or \n CLI argument `{} arn:aws:iam::account-id:role/role-name`'.format(sys.argv[0]))
            exit(1)

        # Get variables from the metadata server
        try:
            instance_name = get_metadata('instance', 'hostname')
        # Cloud Run environment does not return instance name. use 'unknown' instead.
        except SystemExit:
            instance_name = 'unknown'
        project_id = get_metadata('project', 'project-id')
        project_and_instance_name = '{}.{}'.format(project_id, instance_name)[:64]
        token = get_metadata('instance', 'service-accounts/default/identity?format=standard&audience=gcp')

        # Assume role using gcp service account token
        sts = boto3.client('sts', aws_access_key_id='', aws_secret_access_key='')

        res = sts.assume_role_with_web_identity(
            RoleArn=aws_role_arn,
            WebIdentityToken=token,
            RoleSessionName=project_and_instance_name)

        aws_temporary_credentials = {
            'Version': 1,
            'AccessKeyId': res['Credentials']['AccessKeyId'],
            'SecretAccessKey': res['Credentials']['SecretAccessKey'],
            'SessionToken': res['Credentials']['SessionToken'],
            'Expiration': res['Credentials']['Expiration'].isoformat()
        }

        print(json.dumps(aws_temporary_credentials))
---
apiVersion: v1
kind: Pod
metadata:
  name: test-pod
spec:
  serviceAccountName: test-sa
  containers:
  - name: test-container
    image: amazon/aws-cli:latest
    env:
    - name: AWS_ROLE_ARN
      value: "arn:aws:iam::996145069080:role/aws_role"
    volumeMounts:
    - name: get-aws-cred
      mountPath: /usr/local/bin/get_aws_cred
      subPath: get_aws_cred
    command: ["/bin/bash"]
    args:
    - "-c"
    - |
      yum update -y && yum install -y python3 python3-pip
      pip3 install urllib3==1.26.16
      pip3 install requests boto3

      mkdir -p ~/.aws
      echo "[default]
      credential_process = python3 /usr/local/bin/get_aws_cred $AWS_ROLE_ARN" > ~/.aws/credentials
      chmod 600 ~/.aws/credentials

      aws s3 ls
  volumes:
  - name: get-aws-cred
    configMap:
      name: gcp-aws-credentials-script
      items:
      - key: get_aws_cred
        path: get_aws_cred
        mode: 493
When you run this Pod, it will successfully execute the aws s3 ls command.
Conclusion
By using GKE Workload Identity and AWS IAM Role OIDC integration, GKE workloads can securely and efficiently access AWS resources without insecure Access Keys. While the initial setup may seem a bit complex, once established, it offers significant benefits.
I hope this guide helps you enhance security and improve operational efficiency in your GKE and AWS environments.
References